The color contrast in the path-line between each stage in the business process flow to a slightly darker shade. This will help users easily identify and follow each stage in a business process flow when working with data on a form in a model-drive app.
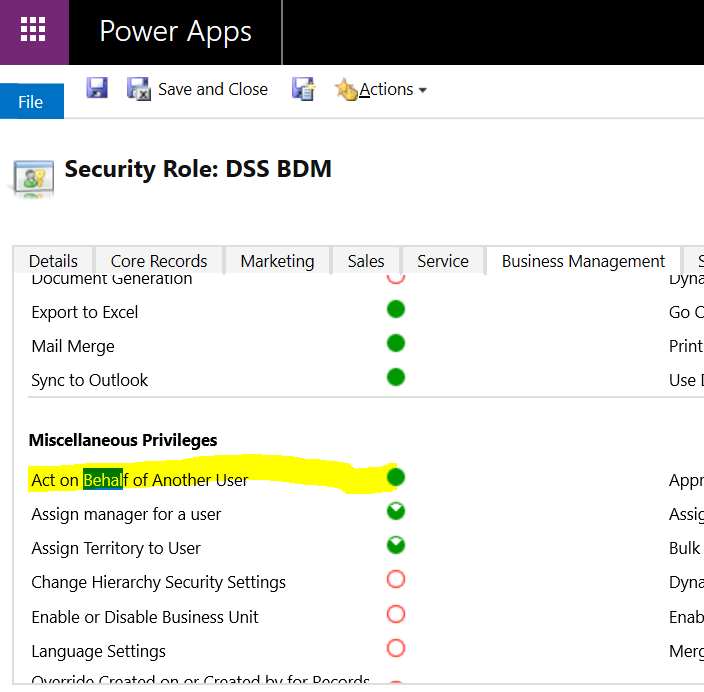
Now you can see who’s currently working on a record including their online status. You can also start a chat or send them an email and take collaboration to the next level. This feature is currently available on the Account, Case, Opportunity, and Contact tables.
So when I started plugin development I referred some blogs and videos then quickly started building plugins. Easy Peasy !! 🙂
In most of the blogs and videos on plugin development I haven’t found any one focusing on debug vs release part.
Every time I would write a plugin I would see two folder while trying to Register the plugin Debug and Release . But I didn’t care less. One day it just hit me what is this release folder and why is this even present as it always used to be empty after building the project.
Microsoft be Like – Seriously?? why it’s present ??? We have named it Release it cannot be more obvious than this. It for Release (Deployment) you dumb**s 🤦♂️🤦♂️🤬
I know people from .NET background or the people who have learnt this in early stage of their plugin development would be like Hey this like 101 of Development.
But for the folks on the other side who are like me. Lets get Started will explore what is difference between the two with some live example.
In short bin\debug is for development and bin\release is for deployment
Navigate to Visual studio -> Properties . You will see the below window. If You click on Configuration Drop Down there will be two option debug and release
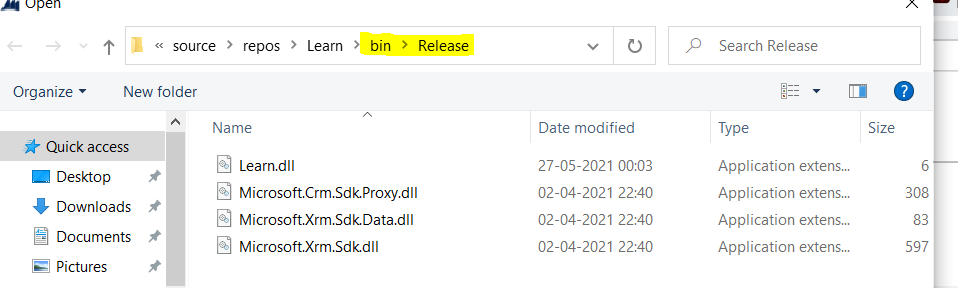
If you select Release -> Ok and Build the plugin. You will be able to see the dll in the release folder.
Release builds are optimized for speed and debug builds are optimized for well debug-ability.
Let’s prove this.
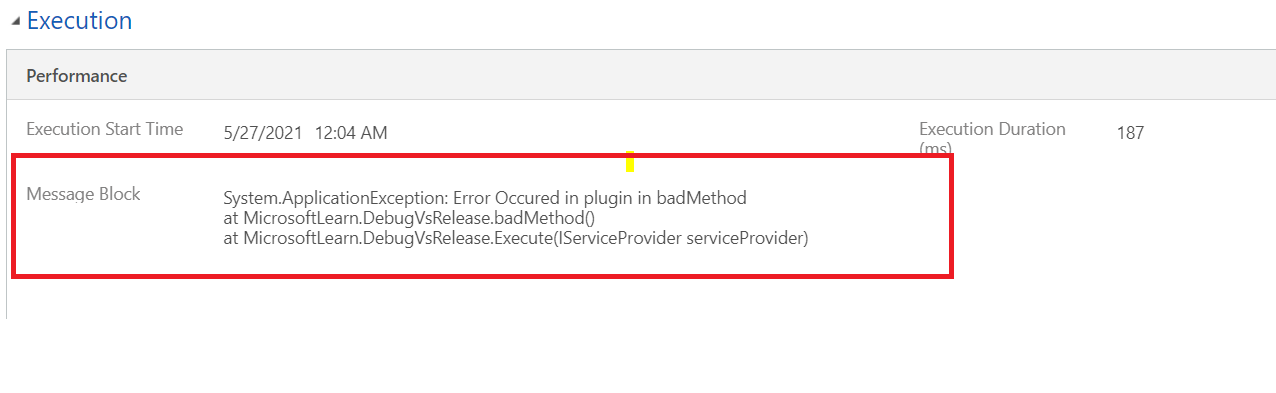
Consider the below code. In this program Execute Invoke A the A calls B, which calls C, which calls badMethod which throws an exception. So far, makes sense right?
If you will check the trace of the plugin in Debug mode and Release mode you will notice the difference.
using Microsoft.Xrm.Sdk;
using System;

namespace MicrosoftLearn
{
    public class DebugVsRelease : IPlugin
    {
        public void Execute(IServiceProvider serviceProvider)
        {
            IPluginExecutionContext context = (IPluginExecutionContext)serviceProvider.GetService(typeof(IPluginExecutionContext));
            IOrganizationServiceFactory factory = (IOrganizationServiceFactory)serviceProvider.GetService(typeof(IOrganizationServiceFactory));
            IOrganizationService service = factory.CreateOrganizationService(context.UserId);
            ITracingService tracingService = (ITracingService)serviceProvider.GetService(typeof(ITracingService));
            if (context.InputParameters.Contains("Target") && context.InputParameters["Target"] is Entity)
            {
                try
                {
                    methodA();
                }
                catch (System.Exception e)
                {
                    tracingService.Trace(e.ToString());
                }
            }
        }
        static void methodA() { methodB(); }
        static void methodB() { methodC(); }
        static void methodC() { badMethod();}
        static void badMethod() {
                 throw new ApplicationException("Error Occured in plugin in badMethod");
       }
    }
}
Debug Mode : Complete Stack Trace
Now build the same plugin in release mode and deploy it to CRM from the release folder.
Our call stack has been “collapsed”?
What you write isn’t exactly what runs, especially when things are optimized. In Release version our code gets optimized. Not every method got their own local stack frame as they were optimized into fewer methods. This technique used by Just-In-Time compiler(JIT) to optimize the code is called Method Inling.
If you want to check if JITER (Just in time compiler) is really doing inling or not. Use [MethodImpl(MethodImplOptions.NoInlining)] for every method it will tell the Just in time compiler not to inline the method. But it’s beating the whole purpose of JITTER optimization.
As you can see after using [MethodImpl(MethodImplOptions.NoInlining)] inling by JITER (Just in time compiler) is suppressed and we call see the entire call stack similar to debug mode.
So far so so good
Now let’s decompile both the debug dll and release dll to see the difference if any?
How to decompile dll: Download dotPeek and use it to open the dll.
First Release dll
Now Debug dll :
You can see debugging mode is default and most important is DisableOptimization. So in debug mode optimization of the code is disable where as in release mode code is optimized.
Need to register the app and application user is required for server-to-server authentication
An enterprise can create a web application or service to connect to any Dataverse environments associated with a single Azure Active Directory (Azure AD) tenant.
Provide the details such as APP name , who can use this application and redirect uri is optional you can leave it as blank
After you have Clicked Register. Your App would be created. Copy the application (client id) mention as below and save it somewhere will need it to create application user
Go API Permission
Click on Add Permission
Select Dynamics CRM
Click on Grant Admin Consent
Click Yes
Now got Certificate & Secrets
Click New client secret. Provide Description and Expires in
Client secrets will be generated. Copy those values and save it. Will need it in future.
Now you need to Register the Application user in Dynamics CRM
Navigate to Setting -> Security -> Users. Change the view to application user.
Create New Application user
Switch Form to Application user
Enter the application ID of your app created in Azure and click save.
If there goes well all others fields will be populated
Before exiting the user form, choose MANAGE ROLES and assign a security role to this application user so that the application user can access the desired organization data.
At this stage we are done with registering the app in azure AD and creating the application user for same.
Note : In an environment, only one application user for each Azure AD registered application is supported. You will not be able to change the primary email address or username once the application user is created.
FetchXml are most commonly used to retrieve records and their attributes. But if we have just used plain fetchXml there are some test cases that we are over looking .
There are some special characters for which your xml will become invalid xml.
Special characters & “ ‘ < > + ;
& will be a very common character in the production data particularly for name of account or products records
Let see the example below
// Retrieve all products with name Wheel & Tube.
var productName = “Wheel & Tube”
string xml = @”<fetch version=’1.0′ output-format=’xml-platform’ mapping=’logical’ distinct=’false’>” +
To the XML parser, the ampersand indicates that what follows is an entity that needs to be parsed into some other piece of data.
When the XML parser finds an ampersand in the XML data, it expects to find a symbol name and a semicolon following it. The symbol name provides a symbolic reference to another entity or character such as the ampersand
How to solve the above problem of & or special chararcters?
Use WebUtility.HtmlEncode(value), you need to add reference for WebUtility System.Net.
Now see the above example with WebUtility.HtmlEncode(value) this will encode the special characters in your fetchXML.
Example & will be converted to &
var productName = “Wheel & Tube”
string xml = @”<fetch version=’1.0′ output-format=’xml-platform’ mapping=’logical’ distinct=’false’>” +
Basic butneeded – In this blog post i will break down the CRM rest builder query code line by line to help you understand what exactly happening in the piece of code.
This post is basically for the the people who are getting started with Dynamics 365 and also for those who did not care too much about what happening inside the code as long as it serve their purpose of retrieve/update/create etc.
Let’s get started. So I have generated a simple piece of code for retrieve request
var req = new XMLHttpRequest();
req.open("GET", Xrm.Page.context.getClientUrl() + "/api/data/v9.1/accounts(475b158c-541c-e511-80d3-3863bb347ba8)", true);
req.setRequestHeader("OData-MaxVersion", "4.0");
req.setRequestHeader("OData-Version", "4.0");
req.setRequestHeader("Accept", "application/json");
req.setRequestHeader("Content-Type", "application/json; charset=utf-8");
req.setRequestHeader("Prefer", "odata.include-annotations=\"*\"");
req.onreadystatechange = function() {
    if (this.readyState === 4) {
        req.onreadystatechange = null;
        if (this.status === 200) {
            var result = JSON.parse(this.response);
            var accountid = result["accountid"];
        } else {
            Xrm.Utility.alertDialog(this.statusText);
        }
    }
};
req.send();
XMLHttpRequest (XHR) objects are used to interact with servers. Here we are interacting Dynamics 365 servers.
1. XMLHttpRequest
 // Here we first create object of XMLHttpRequest
var req = new XMLHttpRequest();
XMLHttpRequest method open() initializes a newly-created request
GET - is a http reqeust method used to get data
url - the URL to send the request to the serverSo here we are sending request to service root url [org name + /api/data/v9.1/]
Example
https://azuredevfordev.crm8.dynamics.com/api/data/v9.1/
You can find the service root URL in developer resourcesaync- optional Boolean parameter, defaulting to true,
indicating whether or not to perform the operation asynchronously.If not provide or set to true -> Code executes synchronously otherwise code will execute asynchronously
/* So here method is GET,
 url is
https://azuredevfordev.crm8.dynamics.com/api/data/v9.1/
 async - is true i.e synchronous
*/

req.open("GET", Xrm.Page.context.getClientUrl() +

"/api/data/v9.1/accounts(475b158c-541c-e511-80d3-3863bb347ba8)", true);
req.setRequestHeader
Okay got it so far but what’s happening here in req.setRequestHeader , I see a bunch of them
Here we are setting the HTTP request headers. But what are HTTP headers actually?
HTTP headers let the client and the server pass additional information with an HTTP request or response. An HTTP header consists of its case-insensitive name followed by a colon (:), then by its value.
Syntax
XMLHttpRequest.setRequestHeader(header, value)

header - name of HTTP header
value - value of HTTP header
setRequestHeader() sets the value of an HTTP request header. When using setRequestHeader(), you must call it after calling open(), but before calling send()
OData-MaxVersion – Clients SHOULD specify an OData-MaxVersion requestheader. If specified the service MUST generate a response with an OData-Version less than or equal to the specified OData-MaxVersion. Header value states the maximum version of the protocol the client can accept in a response.
OData-Version -to specify the exact data service version. If both headers are present, precedence is given to OData-MaxVersion.
3.Content Negotiation– Now we will talk about Content Negotiation
Generally, resources can have multiple presentations, mostly because there may be multiple different clients expecting different representations. Asking for a suitable presentation by a client, is referred as content negotiation.
“Accept”, “application/json” –
Syntax – Accept: <MIME_type>/<MIME_subtype>
application – Any kind of binary data that doesn’t fall explicitly into one of the other types
json – mime_subtype which specifies that client is excepting response in json format.
You can specify the other format like html,xml, etc
To determine what type of representation is desired at client side, HTTP header ACCEPT is used. For example here ,it simply means client is requesting data in Json format.
So Content-Type and Accept seems to be doing thesame thing. Is it so?
No, let see how they are differentAccept: is what client is expecting.Content-Type: is what format the actual data is in
it's primarily
meant for put or post request However, strictly
speaking the specs
itself does not rule out the possibility of HTTP GET
contains a payload
https://tools.ietf.org/html/rfc7231#section-4.3.1Content - type is Representation header field which
provide metadata about the representation.
When a message includes a payload body,
the representation header fields describe
how to interpret the representation data enclosed
in the payload body
Also what does charset=utf-8 doing here?
Content-type: application/json; charset=utf-8 designates the content to be in JSON format, encoded in the UTF-8 character encoding.
5.“Prefer”, “odata.include-annotations=\”*\””
The Prefer request header field is used to indicate that particular server behaviors are preferred by the client but are notrequired for successful completion of the request
What does odata.include-annotations=\”*\”” is doing here?
“*” – represent all annotations
What happens when you retrieve a lookup field? You get a bunch of other values along with Guid
This is because we have include all annotations in the code. Now try with “-*”. You will get only Guid. This is because “-*” indicates no annotation.
Example of annotations
6.this.readyState
While we debug we get multiple values for this.readyState like 0,1,2,3,4 but have we tried to figure out what they actually represent?
this.readyState – property returns the state an XMLHttpRequest client is in
When it’s 4 state is DONE.
7. req.onreadystatechange
property defines a function to be executed when the readyState changes.
XMLHttpRequest.onreadystatechange = callback;callback is the function to be executed when the readyState changes.
8. this.state
HTTP response status codes indicate whether a specific HTTP request has been successfully completed.
Recently we came across a scenario in which we need to force roll up field calculation. We did not wanted to wait for roll up calculation by CRM system.
using Microsoft.Crm.Sdk.Messages;
using Microsoft.Xrm.Sdk;
using Microsoft.Xrm.Sdk.Query;
using System;
using System.Collections.Generic;
using System.Linq;
using System.Text;
using System.Threading.Tasks;
namespace Sample Plugin
{
public class Update RollUp Field : Plugin
{
public void Execute(IServiceProvider
service Provider)
{
//Extract the tracing service for use in
debugging sandboxed plug-ins.
ITracingService tracingService =
(ITracingService)service Provider.GetService
(typeof(ITracingService));
// Obtain the execution context from the service provider.
IPluginExecutionContext context = (IPluginExecutionContext)serviceProvider.GetService(typeof(IPluginExecutionContext));
// To create organization service
IOrganizationServiceFactory serviceFactory = (IOrganizationServiceFactory)serviceProvider.GetService(typeof(IOrganizationServiceFactory));
IOrganizationService service = serviceFactory.CreateOrganizationService(context.UserId);
// The InputParameters collection contains all the data passed in the message request.
#region On Create
if (context.MessageName == “Create” && context.InputParameters.Contains(“Target”) && context.InputParameters[“Target”] is Entity)
{
Entity Insured = (Entity)context.InputParameters[“Target”];
EntityReference Quote = (EntityReference)Insured[“zh_quote”]; //retrieving quote from custom entity
CalculateRollupFieldRequest crfr = new CalculateRollupFieldRequest
{
Target = new EntityReference(“quote”, Quote.Id), //Entity on which rollup is present
FieldName = “zh_totalpremium” // rollup field name
};
CalculateRollupFieldResponse response = (CalculateRollupFieldResponse)service.Execute(crfr);
Entity QuoteEntity = response.Entity; // this will contain the entity with updated rollup value
var totalPremium = ((Money)QuoteEntity.Attributes[“zh_totalpremium”]).Value;
Entity QuoteEntity = new Entity(“quote”);
QuoteEntity.Id = Quote.Id;
QuoteEntity[“zh_totalpremium”] = new Money((decimal)totalPremium);
service.Update(QuoteEntity); //Update the rollup field
}
#endregion
To Explore CDS metadata microsoft has provided a very useful link. Use this you explore all the properties and attribute of any Entity for Dynamics 365


 aync- optional Boolean parameter, defaulting to